
Back in March my dad’s 2001 Honda Civic developed a leak in one of the brake lines. The ensuing repairs ended up taking until September to finally finish, partly due to my free times and partly because I just had to replace more and more things. This is the story of what I had to do.

April
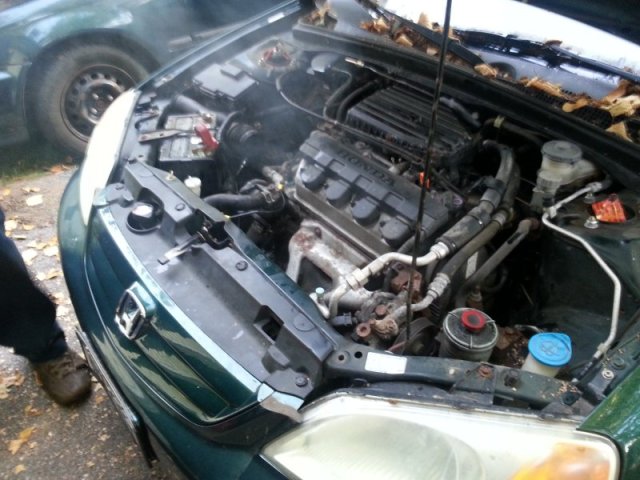
The brake line first started leaking in February or March, but because of the weather I didn’t get a chance to work on it until April. I found that the line going to the right front wheel was leaking. Parts of the brake lines are coated so they don’t rust, but other parts aren’t so they end up leaking after a while. Because of the confined space and corrosion, to loosen the fitting from the proportioning valve I used my little propane torch to heat them up. I tried sticking a bolt into where the fitting was to stop the fluid from all leaking out, but it didn’t work.

As I should’ve expected, using the torch to remove the fitting from the right front brake hose caused the hose to melt. Just the first of the parts I didn’t think I would have to replace.

All of the brake lines I’d dealt with in the past used the inverted flare on the end, but apparently Honda decided to use bubble flares on this model of Civic. I had to drive to work that evening to have a coworker flare the lines for me. Because of the path the right front line had to take I decided to do it in two pieces with a union between them, but unfortunately, I had cut the line just a few inches too short.
I didn’t want to have to have my coworker flare the line again so I rented a flare tool from Pep Boys, but it couldn’t do the right flare. Then I borrowed my shop’s flare tool kit, which is the same type as my coworker’s, but I couldn’t get it to work, and ended up just borrowing my coworker’s kit. Because of the awkward location of the proportioning valve it took me over half an hour just to get the new fitting to thread in.

Right around this time things got complicated when our Accord died. I had planned on working on it when I finished the Civic’s brake line but it took longer than expected and the Accord’s timing chain ended up failing and my parents had to buy a 2014 Civic.

Once I got the right front line finished, it looked like the front line from the master cylinder to the proportioning valve was leaking, so I had to replace that. I couldn’t get enough leverage with my wrench on the fitting and couldn’t use my torch so I had to use a cheater bar, and the only pipe I had was several feet long, so it looked a bit overkill.
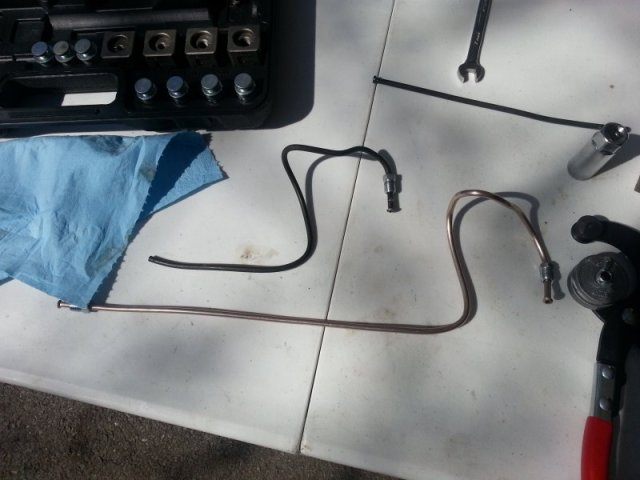
After replacing the front master line, it still looked like it was leaking, so I decided to try making it again, because maybe I hadn’t quite gotten the flare right. At this point I changed to using copper line instead of steel, because it’s impossible to get the lines bent perfectly and they need some slight bending in the car to get them to line up.
May
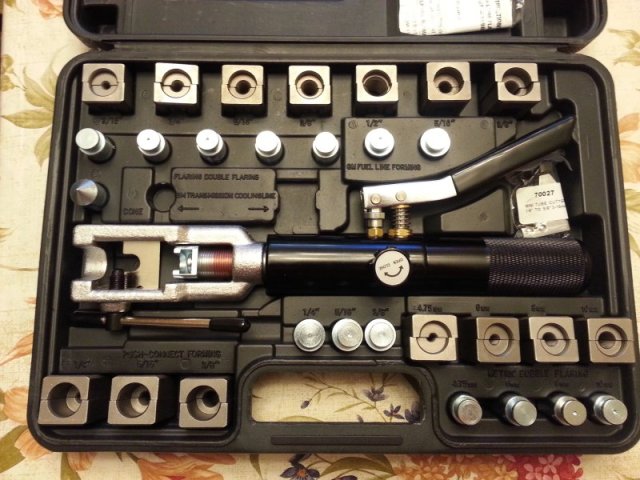
At this point it was worth it to just buy a good flaring kit myself instead of constantly borrowing one. I bought the Mastercool 71475-PRC hydraulic flaring kit for about $275. May was a busy month so I ended up not getting much done, but I did try making the front master line for a third time because it was still leaking from the fitting at the proportioning valve.

June
The only reason I could think of for why there would still be a leak after three tries making the same line was that the proportioning valve had been damaged when I removed the old line. Replacing the proportioning valve then meant that I would have to replace all of the other lines going into it because disconnecting them would either cause them to leak or they wouldn’t want to thread in nicely with their old fittings. So now I had to replace the rear master line, left front line, and the front half of the right rear line.

I only did the front half of the right rear line because if I replaced the entire line I would probably have to replace the rear wheel cylinders, which would mean taking apart the rear drum brakes, which is another long and annoying job. Flaring the existing line on the car was not easy so I decided not to do the left rear line unless it didn’t go into the proportioning valve nicely.

July
I was having a lot of trouble getting all the new lines to thread into the new proportioning valve, just a few minutes would make my hand hurt. Another one of my coworkers, Tatiana, was able to come over and thread them in for me, laying under the car even while it rained without complaining.

I bled the brakes, and everything looked like it was good to go. The wheels went back on and the Civic was finally back on the ground for the first time in months and it was time for a test drive. I got in, pushed the clutch pedal…and it went right to the floor.
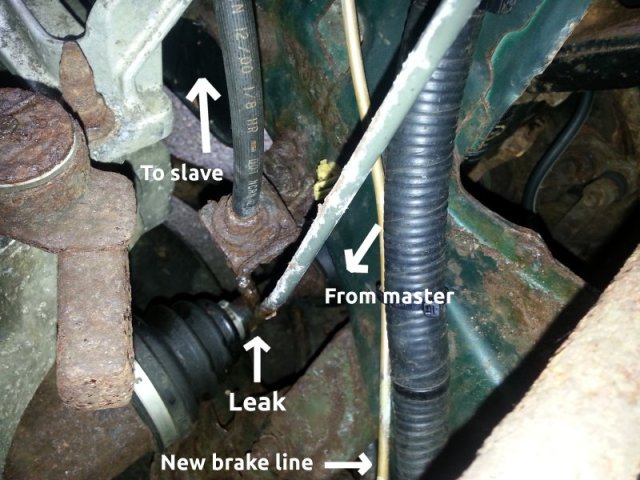
I could’ve expected this. Once brake lines get rusty it doesn’t take much for them to leak, and the hydraulic line for the clutch is basically a brake line. It must’ve gotten touched at some point, because at the lowest and rustiest point it blew out when I tried to take the car for a test drive.
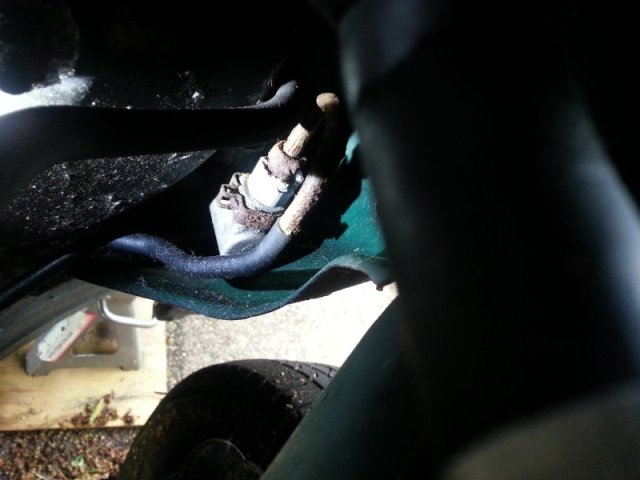
Just like the brake lines, because of how rusty everything was I would have to replace almost all of the clutch hydraulic system. There’s a hard line running from the master cylinder, then a hose, then a hard line to the slave cylinder. The master cylinder is tucked into a nearly impossible spot to reach. It would’ve probably meant removing the windshield wipers to get to it to remove the line, so I decided to only replace half of the first line.

The strange thing about the clutch hydraulic circuit is that the first hard line is 1/4″ diameter tube, but the second is 3/16″, which is what the rest of the brake lines are. Because of this it took a lot longer to get it replaced than I would’ve liked. Unlike the brake lines, the clutch lines needed regular inverted flare fittings. Unfortunately, 12×1.0 inverted flare fittings for 1/4″ tube are extremely hard to find. I found some for 6mm tube, but that turns out to be just slightly smaller than 1/4″.

For the union where the original line was going to connect to the new line, I couldn’t find any metric unions of the right size, so I ended up going with non-metric fittings, making things even more complicated. As always, flaring the line still attached to the car was not fun.

Once I got the lines replaced, all I had to do was bleed the clutch, which can often be a long process. It’s not as simple as brakes where you just open the bleeder and pump the pedal, you have to open and close the bleeder every time you press and release the pedal. I bought a hand-pump vacuum bleeder when my regular bleeding method wouldn’t work, but I still couldn’t get any resistance in the clutch pedal at all.

Eventually I saw what looked like small bubbles leaking around the bleeder screw on the slave cylinder, which is not where the air is supposed to come out. At this point I decided to replace the slave cylinder because maybe it was somehow not allowing me to properly bleed the system.
I still couldn’t get the air out and was out of ideas, so another of my coworkers, Roland, came by after work to give it a try. We finally made progress when he decided to try loosening a fitting at the union in the first section of line, and sure enough, air came out and the clutch pedal immediately started getting better. Because the car had been sitting for months, it needed jump starting, and the brakes were rusted so it took a bit to break free to go for a test drive. Pretty quickly I found out that there was still a problem with the brakes, but not bad enough that I wouldn’t be able to drive it to work to finish up.

I bought a new battery, and it started up fine, but the charging system light was on, and the alternator was only putting out 11.5 volts, when it should be 14 volts. I was still able to drive it to work to finish everything up, though the brake pedal was a bit soft. When I first changed the right front brake line, because of how it’s routed I decided the easiest way to do it would be in two halves with a union connecting them, and I wasn’t sure if it was leaking or not. I brought it into the shop after work and confirmed that it was this union leaking, so I remade the first half of the line for the 3rd time.


The brake rotors weren’t in very good shape after sitting for six months, so I threw them on the lathe to clean them up. I also replaced the rear drums.

The last big thing I had to do to bring the Civic back to full working condition was to replace the alternator. Sitting for several months had cause it to no longer make as much voltage as it was supposed to.
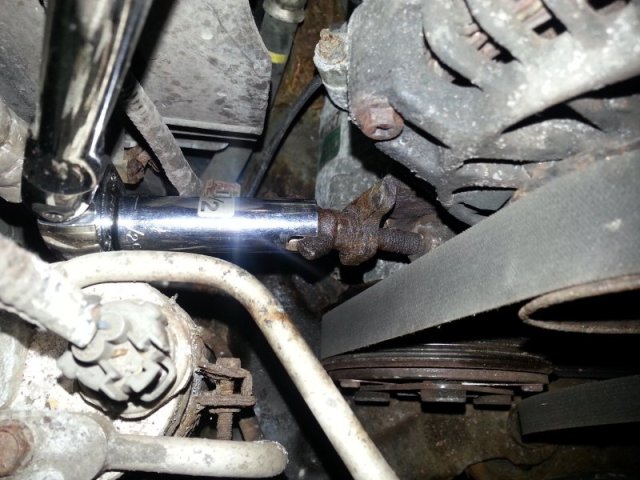
For some reason, when Honda designed this engine, they made the belt tensioners use wing nuts instead of regular nuts. When everything gets rusty like they do here in New York, it gets a lot harder to work with the tensioners. Thankfully, my custom slotted socket works on wing nuts and I was able to loosen the alternator belt pretty easily.
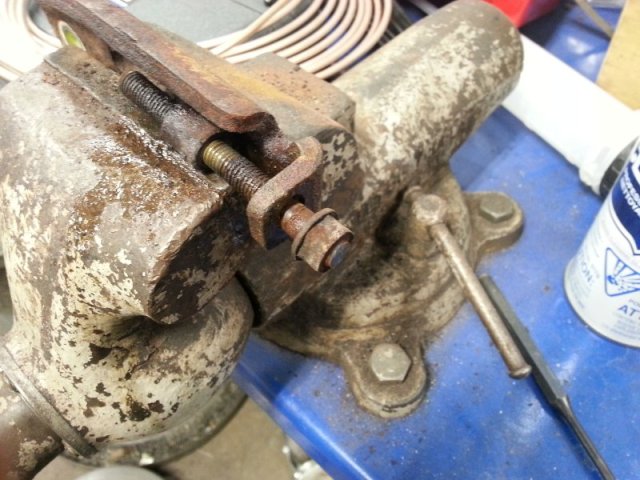
Once I got the alternator out I removed the tensioner and cut the wing nut off, because under the wing but is a regular nut, making tightening the belt a lot easier.
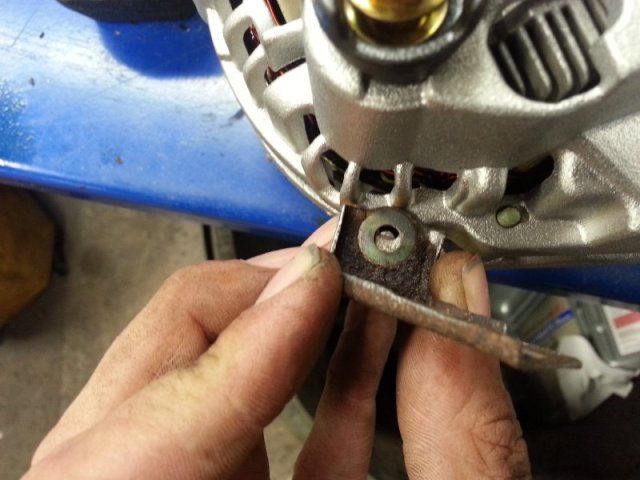
The aftermarket alternator I got had a slightly different case that got in the way of the wiring harness bracket from the original, so I did a little cutting on the bracket to make it fit.


I was finally done with the major work, so it was time to give the Civic a good bath. Months of sitting stationary in the driveway meant it got really dirty, especially with a tree over it. I gave it a good scrubbing and it looks way better.


After all of that there were only a few little things left to do, like change the wipers and air filters. I also had to attach the clutch hose bracket to the transmission with some JB Weld putty because the bolt had broken.

So after all that I was finally done working on the Civic and it was a huge weight off my shoulders. It was $590 just in parts alone, but I was able to save my parents a lot of money, because labor at a regular shop would’ve been at least another $500 if not much more. The moral of this story is that if you go to replace one brake line, you’ll probably end up doing all of them and then some. If you actually read this whole post, thank you.
New blog posts every Monday and Thursday, plus pictures throughout the week on Facebook, Twitter, and Instagram!
Mechanical Malarkey stickers available for $5 anywhere in the US!
-Dan

Embroiled in this nightmare right now, though at least I have an automatic transmission. For some reason finding 3/16″ steel tube where I live is an enormous ordeal, and yes, the pre-fitted brake line that says it’s for “imports/Japanese” cars doesn’t fit correctly.
LikeLike
Thanks very much. You’re a good storyteller.
My ’98 Civic has only 177,000 on it, I’ve maintained it for 19 years – I was starting to wonder what was going to take it away from me. Rusty brake lines.
Buying a used Acura…
LikeLike
FYI, It isn’t just Honda that went to the bubble flares at the joints.
Apparently, the advent of anti-lock brakes made them more-or-less standard, as they handle higher pressure better.
LikeLike
I don’t see how there would be any difference, because it’s the same flare shape, just the other side of it.
LikeLike
Bruh! This is so awesome. I just went through this ordeal with my 2000 Integra. What an ordeal this is. I ripped out all the rusted brake lines and then fabricated 2 pieces for the rear and two lines from the proportioning valve to meet at the center. All worked well until I saw the unions were leaking. Ahhh! Terrible. I used an Imperial USA with the traditional clamp and die design. I noticed you used a Mastercool set. Did that produce great flares consistently? It’s a steep price but I may just have to take the plunge.
LikeLike
I’m trying to think, I think it was pretty consistent. There was at least one I know I ended up redoing because it leaked, but it also would’ve been one of the first when I didn’t have a lot of practice with it.
LikeLike
I have a leak in the exact same line you started with a 2005 with ABS. That means it is one line that runs from the ABS module on the top drivers side of the vehicle and runs down a virtually inaccessible path, then across under the engine in another inaccessible path, and up to the flex hose connector. I expect more lines are going to need replacing, but whoever routed these things must have been a sadist. I really have to consider this more, but part of me is tempted to re-route the lines if I can find a way.
LikeLike
Brake lines are usually one of the first parts installed so they’re usually almost impossible to replace exactly. Good luck!
LikeLike
I appreciate your story. My civic, 2005, has been in Saratoga springs New York for 15 years and let me tell you, it is shot. The rusts on the brake lines have bloomed to where they look like fuzz and the steering rack is completely shot. I am just about to get things rolling from the master cylinder to the wheels. I just can’t seem to figure out what diameter the lines are for the back brakes and the front brakes. This should be fun
LikeLike
All the brake lines should be the standard 1/4″.
LikeLike
The bottom line of my porportioning valve is leaking at the elbow.03 rsx s. I hope the line untreated and I can replace a 5in section. Uggghhh. Maybe bring it to a break shop, it just snowed after 3 weeks of spring.
LikeLike
*untreated
LikeLike
Hey Dan, thanks for this write-up! I’m a new owner of a 2004 Civic Coupe EX (auto) that damn near killed me when a brake line busted going down hill. Upon opening the hood and crawling under it’s obvious a slew of the brake lines are completely shot (thank you, NJ winters). Does anyone sell a replacement kit of pre-bent lines?
I did this for my 2004 Grand Cherokee in a couple hours with ease since the replacement lines were stainless, pre-bent, and ‘bolt-in ready’. Not looking forward to the incredibly daunting and time consuming task of making my own lines.
LikeLike
It looks like you can still get factory pre-bent brake lines, if you’re willing to spend a bit. I haven’t looked, but it’s possible that there are aftermarket companies that do it as well, given the popularity of Civics in the modding community. You said you’ve done it before, so I’m sure you know, sometimes pre-bent lines can be tricky to install because they’re usually one of the first things they put in and are under and behind a lot of stuff. For example, the right front line I made in two parts because I didn’t see how it would be possible to do it all in one piece.
LikeLike
Omg! We have 2 more brake lines to go and the proportioning vale. We already changed the same exact stuff you did (alternator, rotators, calipers, brakes) except the clutch part. Happy to know we’re not alone because I was about to give up with these damn brake lines!!!
LikeLike
Wow what a great post, thanks! I bought a 2003 civic and drove it 60 KM down the highway to my house where the front passenger brake line blew in my drive way. So lucky it didn’t blow on the highway. Getting it off took me 2 days. I bought a 60 in pre flared brake line for “Japanese” vehicles and took 2 hours bending it to match the original only to find it had a SAE double flare and my original had a DIN bubble flare. Man! So I have found a Canadian company that makes a whole new set of pre bent lines. The company is called Fineline if anyone interested. I’m gonna call them tomorrow just to make sure their lines have the proper flare. I sure hop so.
LikeLike